GA part selection
Not version-specific
Tekla Structures
Environment
Not environment-specific
Contents
Purpose and description
System requirements
Installing GA part selection
Using GA part selection
Application properties
Additional information
Purpose and description
Use GA part selection component to filter GA drawings according to selected parts, or to find and select parts in the model based on the selected drawings.
System requirements
Tekla Structures version: Not version specific
Environments: All
Installing GA part selection
To install the extension:
- Download the GA part selection installer package from Tekla Warehouse. For more information see Downloading an application from Tekla Warehouse.
- Install the file package.
Using GA part selection
To use the application:
- Open a Tekla model that has GA drawings already created.
- Click the Applications & components button in the side pane to open the Applications & components catalog.Image

- Search for GA part selection and then double-click to open it.Image

- The GA Part Selection dialog window will open.
You will get the following message: Indexing only reflects the state of the drawing when it was last saved. Do you want to update/save the drawings? If you click:
- Yes - the application will open each drawing and update it and continue with the indexing;
- No - the application will only do the indexing;
- Cancel - the application will cancel the indexing.
Indexing of the objects from the drawing will be performed immediately as the dialog window is open.
While the indexing is being performed the following message will appear: The drawings are being indexed. Please wait until indexing is complete.
Image

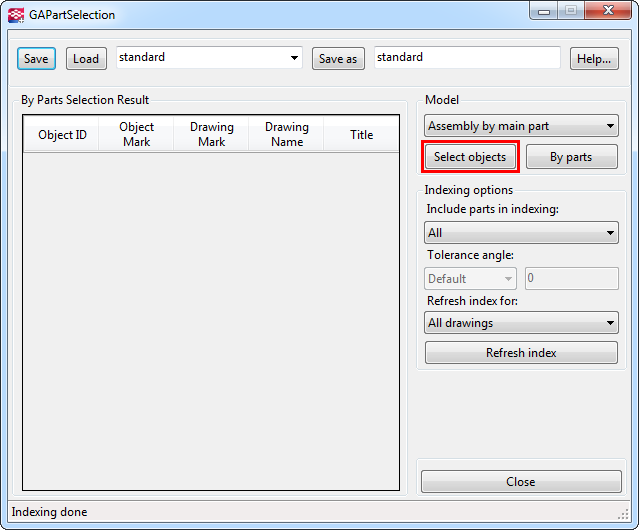
After the indexing is done the message will change to Indexing done.
Image

- If you want to select the objects that are included in a GA drawing, click Selected objects.
The following message will appear in the status bar: Please select a GA drawing from the Drawing list.
Note: If the Tekla Drawing list is not open, it will be opened.
Image

- Select the desired GA drawing.
Image

- Click again on the Select objects button from the GAPartSelection window.
- If you have selected the Assembly by main parts option, the application will highlight all the assemblies that contain their main part in that drawing.
- If you have selected the Assembly by any part option, the application will highlight all the assemblies contained in that drawing, regardless if their main part is not included.
- If you have selected the Parts option, the application will highlight all the parts contained in that drawing.
The following messages will appear in the status bar:
- Selection of objects in progress – while the selection is made;
- Selection of objects done – when the selection is done.
Image
- If you want to list only drawings associated with the objects you have selected in the model, first you have to select a part form the model.
- Click the By parts button.
- If you have selected the Assembly by main parts option, the application will display all the drawings that contain the main part of the assembly from which the selected part belongs to.
- If you have selected the Assembly by any part option, the application will display all the drawings that contain the selected part.
- If you have selected the Parts option, the application will display all the drawings that contain selected part.
The following messages will appear in the status bar:
- Selection of correspondent drawings in progress – while the selection is made;
- Selection of correspondent drawings done – when the selection is done.
- All the GA drawings in which the part is included will appear in the By Parts Selection Result list.
Image

Note: You can double click on a row and the corresponding drawing will open.
Application properties
By Parts Selection Results
Field Description Object ID Display the object ID. Object Mark Display the object mark. Drawing Mark Display the drawing mark. Drawing Name Display the name given to the drawing in the drawing properties dialog box. Title Display the drawing title added in the drawing properties dialog box. Model
Field Description Object selection type Define the object selection type.
The options are:- Assembly by main part (Default);
- Assembly by any part;
- Parts.
Selected Objects Highlights, in Tekla model, the objects associated with the drawings you have selected from Tekla Drawing List.
This button becomes inactive while the indexing of the objects is made.By Pats Lists only drawings associated with the objects you have selected in the model.
If no part is selected the following message will appear: No part selected or the indexing was not performed.
This button becomes inactive while the indexing of the objects is made.Indexing options
Field Description Default Include parts in indexing Define what parts to include in indexing.
The options are:- All;
- Parallel with view plane.
All Tolerance angle: Define the angle of tolerance for parallelism.
The options are:- Default;
- Custom.
is defined by XS_OMIT_MARKS_
OF_PARTS_OUT_OF_
VIEW_PLANE_LIMIT_
ANGLEDefine the custom angle tolerance.
This field becomes active if Custom is selected in the angle of tolerance for parallelism list.Refresh index for: Define the angle of tolerance for parallelism.
The options are:- All drawings;
- Selected drawings.
All drawings Options
Field Description Refresh index Use this button to index objects from the drawing into a temporary list.
This button becomes Cancel indexing while the indexing of the objects is made. Use Cancel indexing button to cancel the indexing.Close Use this button to close the application.
This button becomes inactive while the indexing of the objects is made.Status bar The application window is set to wait, and the dialog shows a progress bar indicating the preview creation progress.
Additional information
- If you try to open a drawing using the application, and the drawing is missing, the following message will appear: “Drawing not found!”