BCF 2.1 Comment Tool
2020
Tekla Structures
Environment
Not environment-specific
Overview
This is the new version of the Comment Tool. The BCF Comment Tool supports the final version of the BCF 2.1 standard to enable full collaboration between disciplines.
Instructions
Important: This tool is not compatible with the older Comment Tool and its 2.0 schema. The old and new tool can be installed in parallel. They use different folders for the private comments, and should not share comments to the same location. Continue to use the old tool in projects where it's already taken into use, and use the new tool in new projects.
At the first startup, the tool asks for a Trimble account (e-mail). This enables collaboration among all parties.
Image

Updates from the old Comment Tool:
- Uses BCF 2.1. You're limited to create only one viewpoint per topic or reply. You can create several replies to share more viewpoints. A topic created in another software may contain multiple viewpoints and those are available in a topic or in comments if they are used in any comments.
- The path to the folder used to store private comments is C:\Users\<user>\.PrivateCommentsBCF. This path cannot be changed.
-
Image

1. Purpose and description
BCF Comment Tool allows users to communicate project issues, changes, questions, and even work assignments through the Tekla Structures model. The comments can include model snapshots, a camera view location, documents, websites, and either Tekla Structures native or IFC reference model objects linked to them. The comments are automatically stored in the model- specific folder C:\Users\<user>\.PrivateCommentsBCF.
The comments can then be shared with others from the comment tool by specifying a folder that the tool uses to write and read shared comments. This folder can be, for example:
- a model folder of a multi-user model
- on a company server
- a stand-alone comment folder on a company server
- a local folder automatically synchronized across computers and companies by a file share application, such as Dropbox ( http://www.dropbox.com ).
In addition, comments can be sent and received using e-mail or via an FTP site.
This gives users the choice to add or share comments live within a single organization, across organizations that do not share servers, or just have comments and notes for themselves on their projects.
The files created and read by the comment tool use the BIM Collaboration Format (BCF, version 2.1) defined by the global buildingSMART organization. This means that comments, including linked model parts and view positions, can easily be exchanged with other BIM software and project management tools that support BCF.
2. System requirements
Tekla Structures configuration: Any (including Viewer)
Environments: Any
3. Installation and launch
To install and launch the extension:
- Download and install the Comment Tool version 2.1 TSEP from Tekla Warehouse.
- You can double-click the TSEP and install to available versions. If the installation does not open, you can first install TSEP File Dispatcher Launcher from Tekla Warehouse https://warehouse.tekla.com/#!/catalog/details/51309796-3b9a-4e6a-9950-9ceee7a0dcbb.
Or you can use Extension Manager that is located in Applications & components.
- Restart Tekla Structures. A new icon appears in the Applications & components catalog.
Image

4. Basic usage
Open a model in Tekla Structures and click the comment tool icon in Applications & components to start the comment tool. You need to type your Trimble account (e-mail) that is your identifier in collaboration.
4.1. Add a new Topic
Zoom into a specific location in the model that you want to comment. Once you are in the preferred location, click the New button in the top-left corner of the comment tool.
The comment tool creates a new comment with a snapshot of the current view. In addition to an image, the snapshot contains the current location, camera angle, clip planes and selected objects.
Image
Note: If you are adding a comment in the Perspective view and then switch to the Orthogonal view later on (or vice versa), the zoom level is not as it is in the bcf. Agree on a single projection mode to use for all the comments.
The new comment appears in the comment list. To change the Title, Assigned or Status fields, click in the field you want to edit. A pop-up appears and you can enter a new value.
Image

4.2. Write the comment text and add information
The next step is to write the comment itself. Click the comment box next to the comments list and enter a description for the topic.
Image
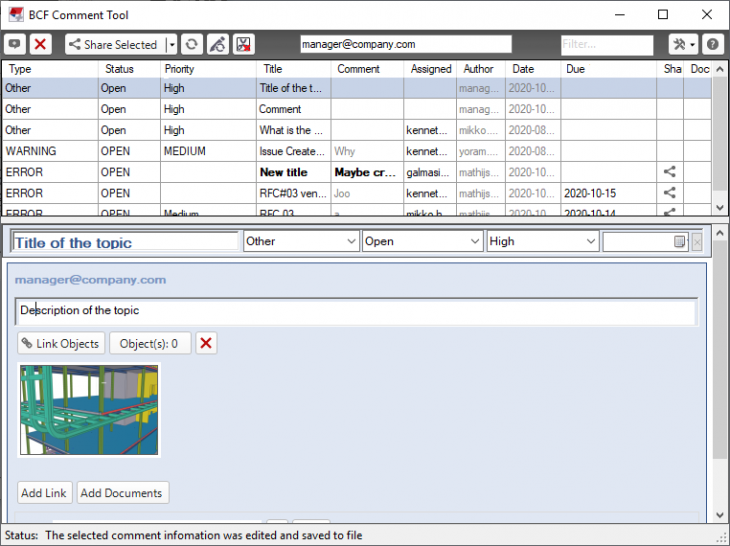
Above the topic description box you can add free text. You can set Type, Status, Priority and Due date. See section 4.2. Topic type, status, priority and due date
When you create a new comment, a snapshot of the current view will be included. Update this snapshot by hovering over it and clicking Update.
You can link selected model objects to the comment. This means that every time atopic or comment viewpoint is selected in the Comment Tool list, the tool will highlight or select the parts linked with the comment in the model (and zoom to them if that option is used). The objects that were selected when you created the new comment are already linked. Change the linked objects by selecting any parts in the model and clicking the Link Objects button. The number of linked objects is visible in the Object(s) button, and the objects can be highlighted by clicking the button.
Next, you can link a url or a file to the comment. Click Add Link and enter a url address or path directly in the Link field that appears, or click the ... button next to the field to browse for a document on your computer or in a server folder. The file path will be inserted and stored with the comment. Clicking the Open button opens the linked document with the default associated application for that file type or extension. Web links open in Internet Explorer.
Tip: If you use a dot (.) as the first character of the path, it will refer to the current model folder. If you share the comment (see Sharing) and another user then opens the comment, the url will now refer to their model folder. This can be useful for shared models and notes. The dot will be inserted automatically if you browse to a file in the current model folder.
Additionally, you can link or copy documents to the comment. Click Add Document and enter the document path and a description. If you click Copy to Comment, the actual document file will be included and shared with the .bcf comment file.
Tip: You can take a new snapshot manually by hovering over the current snapshot and deleting it, then clicking the drop-down button next to Add Current View and selecting Capture. Pick two points on the screen to define the screen area to capture.
Image

Tip: You can add redlines to a snapshot by hovering over it and clicking Edit. The image opens in the application that is associated by default to open *.png files. After you have finished editing, save the image and close the editing application. The image will be updated in the comment tool.
When you are happy with your comment text and information, click Save to save the comment. A topic remains as private and editable until it is shared. When a topic has been shared, it can be commented.
4.2. Topic type, status, priority and due date
It is possible to adjust topic type, status, priority and due date based on specific needs.
A list of available types, statuses and priorities are stored in the Options subfolder under the application startup folder. It is possible to copy the folder and files to the C:\Users\<user>\.PrivateCommentsBCF folder and add the preferred options to the files..
These properties are optional. Also the due date is optional. It can be reset from a small button right from the date picker if needed. Changes to the field values are added to the shared comment after the topic has been shared.
4.3. Reply to a topic
After you have shared the topic, you can add a reply to it. Click inside the comment box that appears after your last comment and start writing your reply, and then click Share. The comment will be added as a reply to the current thread.
Image

Tip: You can take new snapshots or update the status in each new reply.
4.4. Viewing topics
When you select a topic in the list, the topics pane is displayed showing the replies and snapshots. You can switch to the views that were stored with the comment by clicking the snapshot thumbnails.
Tip: When you select one or several topics in the list, any linked parts will get selected in the model. After selecting a comment, right-click the model view in Tekla Structures and select Show Only Selected to quickly isolate the linked parts.
4.5. Identify parts with topics and comments
All (native) parts with associated comments are indicated with a label in the model. If you select one or several parts that belong to a comment, the associated comments are highlighted in the comment list.
Image

You can redraw symbols with
Image
4.6. Filter topics
Image
To search for a comment, enter a string in the filter text box in the toolbar and the topics will be filtered as you type.
When you do this, your topics list will only show topics that contain any portion of the text string.. The tool will search in topic titles and bodies as well as in the status and assigned fields. To remove the filter, empty the filter text box.
4.7. Settings
Image
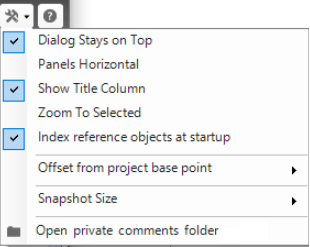
Under Settings, there are options for always keeping the dialog box on top of other windows, changing the orientation of how the comment tool dialog box is displayed, and zooming in on associated objects when you open a comment (as opposed to restoring the saved camera view).
There's also an option to Index reference objects at startup. In models with a large number of reference models, the startup of the comment tool can last several minutes while the reference model objects are being indexed. You can turn off the indexing with this option. The trade-off is that switching between different comments may last several seconds while potentially associated reference objects are being located.
It's also possible to open the folder where the private comments are stored.
5. Sharing topics and comments
All topics are automatically stored privately to a model-guid-specific folder under the C:\Users\<user>\.PrivateCommentsBCF folder. You can then decide which topics you wish to share with others. The .bcf (zip) format (version 2.1) is used for sharing, which means you can share topics and comments to topics with all software that are compatible with the BCF version 2.1.
5.1. Share using the Share Folder
You can share topics and comments to topics to any folder in your system or in your network.A very convenient way to share topics/comments is to use a file sharing or synchronizing service, such as Dropbox. Just point your comment tool to a folder that is set up to automatically synchronize across computers and companies (see the specific sharing service documentation on how to share/synchronize a folder with others).
To specify a share folder, open the sharing menu and click Set Share Folder. You can then see the current share folder at the bottom of the sharing menu. The Open Share Folder button will show the folder content in Windows Explorer.
Image
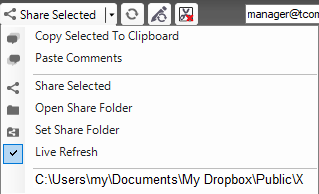
Now select one or several comments that you want to share and click Share Selected. The selected comments will be packed and copied to the shared folder.
Sharing multiple comments at once will create a single .bcf file. Sharing a comment multiple times will create multiple versions of the .bcf file, each with a unique timestamp.
When you are writing a new comment or making a reply to a comment, you have only the option to Share under the comment box. This saves the comment or reply, and then immediately shares the comment or reply (topic along with the whole comment thread) to the share folder.
5.2. Share via e-mail
To share via e-mail, first select the comments you want to share and then go to the sharing menu and click Copy Selected to Clipboard. Now create a new e-mail in Microsoft Outlook and just right-click the message body and select Paste. This will add the comments in an attachment to the e-mail.
Tip: The copied comments are placed as files on Windows clipboard, so you should be able to paste comments into any e-mail client or application that supports pasting files from clipboard. If this doesn’t work for your client, just share the comments to the share folder (Share Selected) and attach the .bcf file from there.
5.3. Get topics/comments from others
New topics are read into the comment tool directly from the share folder. If there are several comment tool users collaborating, they should all share topics/comments to the same network folder, or alternatively use a folder that is automatically synchronized with others, such as a Dropbox folder. Then every time somebody shares a topic/comment, it will immediately be available to all the other users.
When you click the Refresh button, the comment tool will read in all the topics and updates it finds in the shared folder. New topics will show up in green, and existing comments that have updates or new replies will show up with a light green background.
Image

If somebody uses another application for creating a topic or for commenting, they can export the .bcf files from that application to this same shared folder. Topics/comments will then be read into your comment tool when you refresh.
If you receive .bcf files via e-mail, you can just drag them to the topics list in the comment tool to open them. These topics are handled as private topics. You can also copy the received comments to the shared folder and click the Refresh button like previously described.
Tip: If you enable Live Refresh on the sharing menu, the comment tool will automatically read in new and updated topics/comments as soon as they are added to the shared folder.
5.4. Details on how .bcf sharing works
Sometimes several users might reply to the same topic independently, and you might receive these files from different sources and at different times, often not even in the same order that they were created.
When refreshing from the shared folder, the comment tool will compare the content of all .bcf files it finds. If there are several files containing different replies to the same original topic, they will be merged and shown as a single topic with replies sorted by their timestamp.
At each launch of the comment tool, the comments will be compared and merged as described earlier. In addition, the comment tool creates a single .bcf file per comment. The original files are then deleted, but the share folder still contains the same information. This is to avoid having .bcfF files piling up in the folder.
All issues are always stored also locally. If comments are deleted from the shared folder, they still remain as a local copy in your comment tool. If you then write a reply to a deleted topic and share it, the whole thread is again available in the share folder.
5.5. Coordinate systems of the comments
Image
The comment tool uses the project base point coordinate system by default.
6. Create topics in multi-user mode
You can use the share folder to share topics in multi-user mode. The share folder can be set to a folder in the master model folder on the server, which means that everyone working on the model will have instant access to any shared comments.
You can change the shared comment folder location by clicking the Set Share Folder button on the Share menu. You can also browse for the comments folder using Windows Explorer by clicking the Open Share Folder button.
Image

Note: The share folder makes it possible for users in multi-user mode to see and add topics, and comment within the same project at the same time. Comments added in a multi-user model do not require all the members in the model to save the model before seeing the topics/comments because the topics themselves are not stored in the model database, they are external files only linked with the model. This is useful especially if you have two copies of the same model loaded up on two different computers, for example, in different offices across the country or world, and yet you can set your shared folder to a shared network folder that both offices can access. .bcf files are very small compared to the model, which means that you can share comments live across long distances through a server folder without having to exchange the models themselves.
Try using the comment tool in a multi-user model with a colleague. If you click Live Refresh on the Settings menu, you will notice that when you both have the comment tool open and you start to add and share topics/comments, the topics/comments appear automatically on the other person’s screen. New topics/comments will show up in green, and existing comments that have updates or new replies are bolded.
Image

Next, try the following, where one person closes the comment tool session, and the other person continues adding topics and commenting to them. After a few additions and changes, reopen the comment tool. Notice that when you reopen the comment tool, some comments will appear at the top in green and some blue. The comment tool remembers the comments from your previous session compared to what has changed, and notifies you of the differences. Comments appear in the list from the most recent to the least recent.
Image

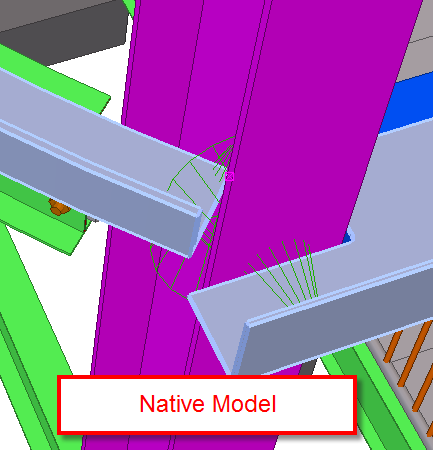
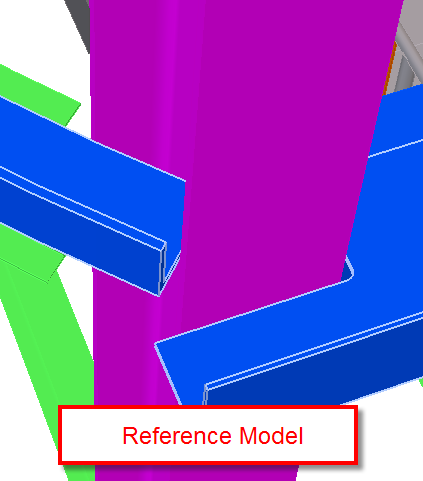
7. Create comments in two Tekla Structures models, one native, one IFC reference
The next step in your testing is demonstrating how you can create comments on IFC model objects after the IFC model has been subdivided. In this suggested test workflow, you will export an IFC file of the current model you were using before (File > Export > IFC2x3 or IFC4). Then create a new Tekla Structures model and insert that IFC file as a reference model into the new empty Tekla Structures model (File > Insert Reference Model). Ensure that when inserting the reference model you insert the model in the same orientation and at the same origin as your native Tekla Structures model.
Next, re-open the comment tool and change the shared comment folder location in this new model to be the same comment folder as in your previous Tekla Structures native model. When you do this, you will see the comments from your other model appearing here. Make sure your 3D Model view properties are set to the same mode (Perspective/Orthogonal) that was used when adding the comments . Click the comments in the list, and notice you are zoomed into the same locations as defined in your original model, and that the IFC model objects are highlighted that represent the same native objects that you linked to comments in your previous model.
Image
Image
If you are an Engineer and have some IFC files from an Architect, or if you are a General Contractor and have some mechanical or other IFC files, insert those into the model. You can link those objects to comments in the comment tool, too. Make sure you have the Select Objects in Components selection switch chosen on your selection toolbar before selecting the IFC reference objects to link with your comments.
Image
One suggested workflow is that even detailers who are working with a project team of designers using a different set of BIM applications that can produce IFC models can use those models in Tekla Structures for coordination with their Structural Detailing model. For example, a steel detailer can insert MEP, Architectural, and Structural Engineering IFC models into a copy of his structural detailing model or into a new empty Tekla Structures model, where he also inserts a copy of his Structural model published in IFC model format. Now all of the models are saved into one single Tekla Structures model, and the detailer can send this to a General Contractor, or Design Team that can even be at a minimum using a Viewer license to navigate the joined models, inquire properties, measure in the model, and most importantly, can add or review comments in the joined model. Those comments can easily be sent back and forth between the Design and the Detailing team making it easy to communicate in a protected IFC reference model environment. The Tekla Structures platform is designed to handle a large amount of detail and models compared to some other BIM software, so for review and communication purposes Tekla Structures can be used by other parties to review the project more efficiently and effectively.
Even if you are not in the same company with a shared server folder, you can still try and setup a live commenting session. This can be done with a file sharing and synchronizing service such as Dropbox ( www.dropbox.com ). Tekla does not endorse or hold any liability for use of Dropbox, but when testing with the comment tool, it has been easy, free and quick to setup a live multi-company commenting system using the basic file folder synchronizing functionality Dropbox provides. So the workflow might look like the one below:
Image

8. Summary of example workflows
Here are 4 examples in which the comment tool can be used:
- In a live multi-user model environment for exchanging checking comments, daily work assignments or questions even before saving the model.
- Keeping a track of RFIs, Change Orders, or problem areas. Essentially, keeping a track of your own post-it notes for your work in the model.
- A Tekla Structures detailer could publish an IFC model of his connected project. A Tekla Structures Engineer or Fabricator could open a new Tekla Structures model with that IFC model referenced and subdivided into it. The Engineer or Fabricator can’t modify the detailer’s geometry, doesn’t need to worry about profile catalogs, numbering settings, etc. They just start adding comments into the model and linking them with IFC reference model objects generated by the detailer. The comment files are sent back to the detailer. He loads those comments into his local native Tekla Structures detailing project, and the comments generated and linked to the IFC reference model objects are now visible and associated with the detailer’s native Tekla Structures objects. This is possible because the comments remember via the IFC guid the link between the IFC and the Tekla Structures native objects they were generated from. This offers a safer and easier form of published project collaboration.
- An erector is on the site and takes a photo of a field condition or area. Using even a Viewer license of Tekla Structures and the comment tool, he can drag a photo image file taken of the field condition and link it to the same corresponding area and parts in the model. This can then be easily zipped and emailed back to the office for the project manager to review.