Improvements in Drawing content manager, marks and notes
2018i
Tekla Structures
Improvements in Drawing content manager, marks and notes
There are a lot of improvements in annotations, Drawing content manager , manual marks, annotation placing, and mark merging.
Annotations - New tab in drawing mode
A new tab Annotations has been added to the drawing mode ribbon. All annotations such as marks, notes, symbols, texts and grid labels have been moved there together with annotation alignment and arrangement commands. Previously, these command were located on the Drawing tab.

Improved Drawing content manager
The Drawing content manager has been improved further for Tekla Structures version 2018i.
Now when you select and highlight building objects or marks in the drawing, you can see the related objects highlighted in the Drawing content manager list. Previously, you could only select objects in the list and by doing so highlight and select marks or objects in the drawing, but not vice versa.
Dimension marks are now considered and counted as marks in the Drawing content manager. The Select part marks command in the drawing pop-up menu selects the dimension marks for the objects that you have selected in the drawing, and you can modify all these marks at one go, or delete them by pressing Delete on the keyboard, for example.
In the example below, a reinforcement object has been selected in the Drawing content manager list, and you have the mark selection switch
 activated. The dimension line and marks are selected and highlighted in the drawing:
In the following example, a dimension line has been selected in the drawing, and Tekla Structures highlights the related reinforcement in the Drawing content manager list.

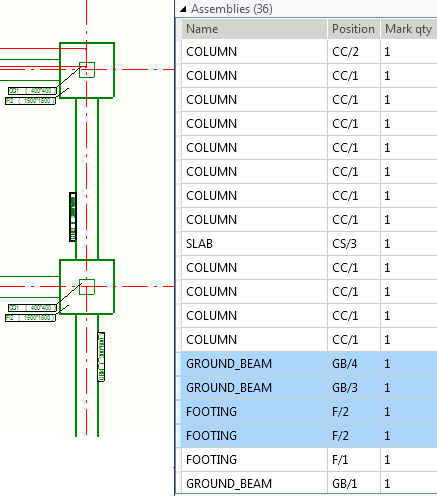
You can now use operators OR and AND in the Drawing content manager search. AND is the default, so you do not need to type it.
For example, to find all ground beams ( GROUND_BEAM ) and footings ( FOOTING ), enter FOOTING OR GROUND_BEAM. To find only ground beams with position number GB/1 , enter GROUND_BEAM GB/1.
For more information about the Drawing content manager , see Drawing content manager.
Add marks using view level properties or current properties
The command for adding marks in building objects has changed. Previously, the Add part mark command in the pop-up menu added marks using view level mark properties. Now with the new Add Mark command you have a chance to select if you want to use view level mark properties or current mark properties:

You can use the Add Mark command for all building objects in drawings, including reinforcement. The Reinforcement mark command has been removed.
For more information about adding marks manually, see Add part marks manually in drawings.
Improvements in mark and note placement
- If you arrange marks, notes or dimensions using either of the two the Arrange drawing objects (Freeplace) commands in the pop-up menu, the placing of these objects is automatically set to free.
If the placing is set to free for associative notes, Tekla Structures will now attempt to find an optimal location for the notes when the you change the protection settings. If placing is set to fixed, the notes will stay at their fixed location even when you change the protection settings.
Improvements in mark merging
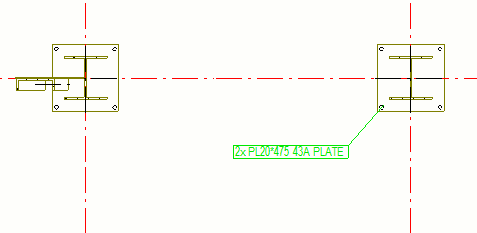
You can now merge part marks and bolt marks manually if their content matches. Earlier, you could only merge reinforcement marks manually. The prerequisite for merging the bolt marks is that they have not been merged already.
To merge, select the marks, right-click and select Merge. If you need to split the merged marks, right-click the mark and select Split.

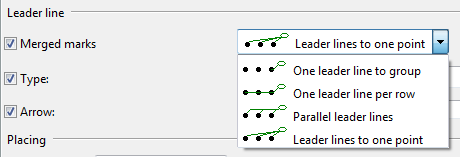
Leader line settings for merged marks have been added to the mark properties. It is now possible to define a leader line going from the mark frame to each part it is related to using the option Leader lines to one point , for example.

If merging part marks fails for some reason, a new error message is displayed in the status bar: "Mark properties do not match, could not merge all marks".
Merged weld and bolt marks are now automatically split when the drawing is opened if the merge is no longer valid.
For more information about merging marks, see Merge marks.
For more information about merging weld marks, see Merge weld marks.
Associative note improvements
Previously, associative notes could only be added manually part by part. You can now add multiple associative notes at a time by selecting the needed parts, right-clicking and selecting Add associative note. Tekla Structures places the notes to the optimal location using the applied leader line type.
A new option is to place the note along the line. The icon has also changed:

Associative notes are now placed more optimally if you change the leader line type and the placing has been set to free.
Holding down Shift and dragging associative notes in drawings works now so that it is not possible to move the leader line base point outside the associated object.
Now the Select part marks command in the pop-up menu also selects associative notes.
For more information about associative notes, see Add associative notes in drawings.
Merging of rebar marks
If merging of the rebar marks is not successful due to settings that are not compatible with merging, or to some other errors in settings, a new error message is displayed: "Could not merge all marks, please check the applied merged rebar mark settings".
When you merge several reinforcement marks, and the mark text is very long, an error message is now displayed, and the marks will not be merged.
For more information about merging reinforcement marks, see Merge marks.
Bolt size limit changed to Ignore size in bolt mark properties
In drawing bolt mark properties, the name of the setting Bolt size limit has now been changed to Ignore size. This setting filters standard-sized bolt marks out of drawings, which means that Tekla Structures does not display bolt marks of the defined size in drawings.