Add reinforcement marks with Rebar group marking application
2018i
Tekla Structures
Add reinforcement marks with Rebar group marking application
The Rebar group marking application offers different styles to create marks to rebar groups and distribution areas flexibly. With the Rebar group marking application you can efficiently create quality reinforcement drawings according to the market requirements.
Mark rebar groups
- Click the Applications & components button
 in the side pane to open the Applications & components catalog.
 - To adjust the mark settings, double-click the mark, and make the necessary changes:
On the Geometry tab, define the shape and position of the rebar mark, and mark line and leader line settings.
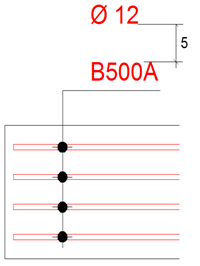
On the Mark 1 – Mark 3 tabs, define the content for the rebar mark, such as the diameter, cc distances and the number.
On the Lines and symbols tab, define the generation settings and the layout of the lines and symbols of the rebar mark.
For more information about the settings, see Rebar group marking settings below.
Tekla Structures creates the rebar marks according to the defined settings.
Rebar group marking settings
Geometry tab
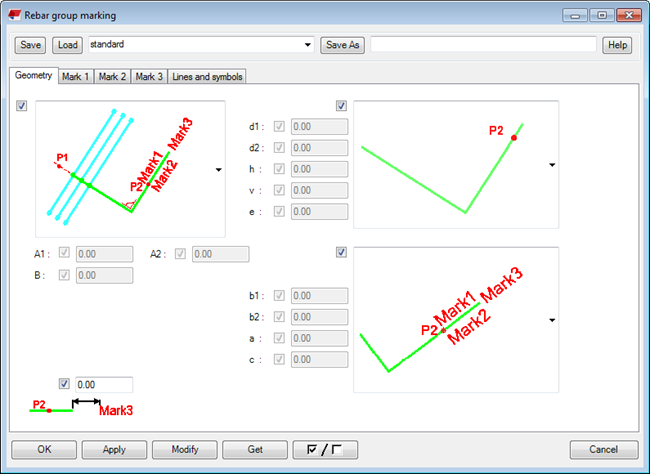
On the Geometry tab, define the shape and position of the rebar mark, and the mark line and leader line settings.
| Setting | Options and descriptions |
|---|---|
|
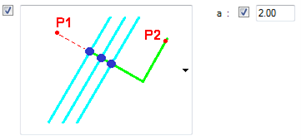
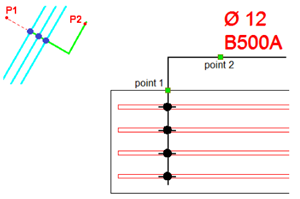
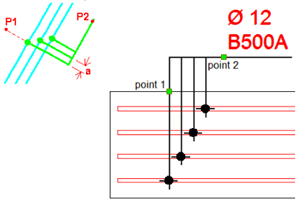
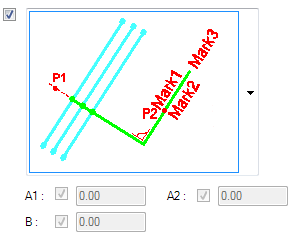
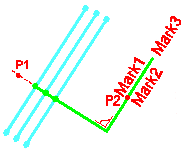
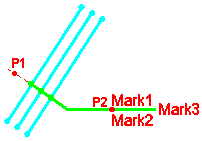
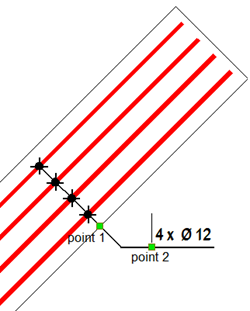
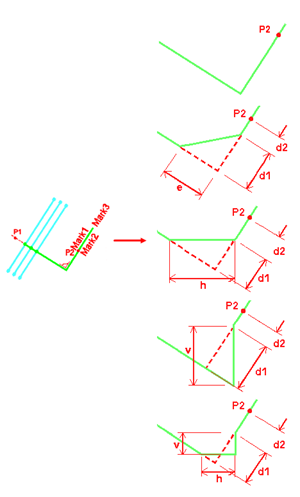
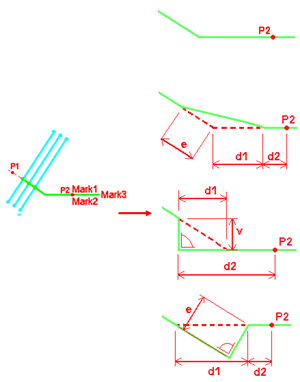
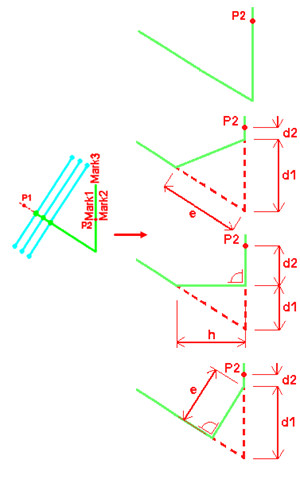
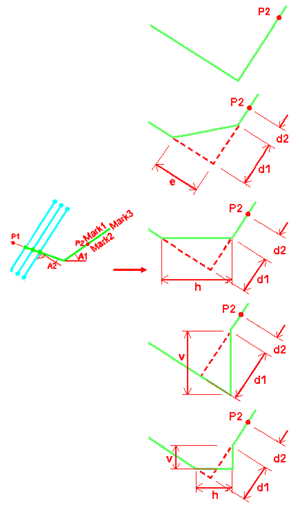
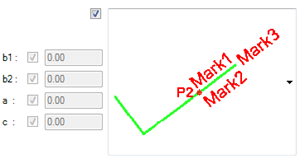
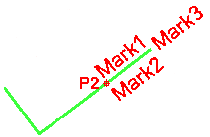
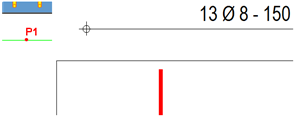
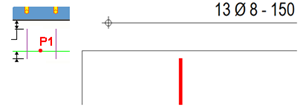
Define the shape of the rebar mark. In the descriptive option images, P1 is the first point that you pick and P2 the second one. Mark x indicates the locations of the marks defined on the Mark 1 – Mark 3 tabs. The options are: Option 1:
Example:
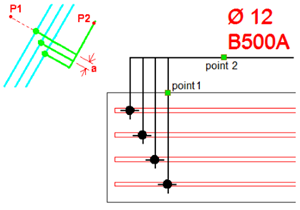
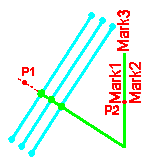
Option 2:
Example:
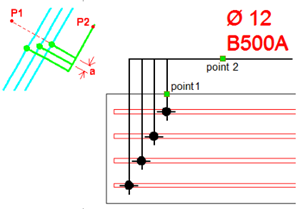
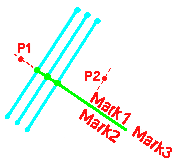
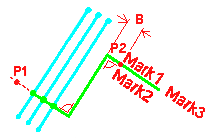
Option 3:
Example:
Option 4:
Option 5:
Option 6:
|
|
Define the shape of the leader line. The available options depend on the selected mark line option.
You can also affect the shape of the leader line for many of the options with the settings d1 , d2 , h , v , and e. |
|
Define the shape of the mark line. The options are
You can also affect the shape of the mark line for some of the options with settings b1 , b2 , a , and c , and e |
|
Define an offset for Mark 3 from the mark line. |


Mark 1 – Mark 3 tabs
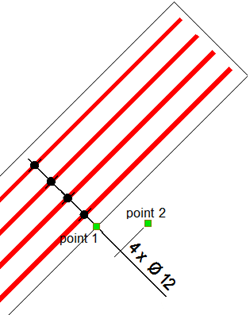
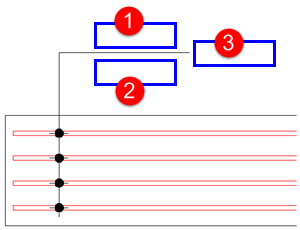
On the Mark 1 – Mark 3 tabs, you can define the content of the rebar marks. You can have three separate marks with the desired content within one rebar mark: Mark 1 , Mark 2 and Mark 3. Each of the marks may have extra marks. The following image shows the position of each mark within the entire rebar mark:
| Setting | Options and descriptions |
|---|---|
Available elements |
Select the rebar information to be displayed in the mark such as grade, diameter and cc distances. |
Elements in mark |
List of the selected information that will be displayed in the mark. |
Text properties |
Define the text properties. The available properties files are the ones that have been defined and saved in the Text properties dialog box. |
Add frame |
Add frame around mark elements. You can select the frame type and color. Note that symbo al, new line and pull-out picture cannot have a frame. |
Create |
Define whether the mark should be created or not. The options are Yes and No. |
Extra mark : Create |
Define whether and how the extra marks are placed in the mark. The options are: No Before main mark Behind main mark |
Units |
Define the units:
Only available for the following mark content:
|
Format |
Define the format:
Only available for the following mark content:
|
Precision |
Define the precision:
For example, for precision 0.33, the actual value 50.40 is displayed as 50.33. 1/8, 1/16, and 1/32 are for imperial units. 1/10, 1/100, and 1/1000 are used for defining precision without rounding. |
Values A B C Sum values A B C Along rebar axis Length along rebar axes Sum segm rebar axis Length TplEd |
Values A B C :
If you select Along rebar axis , the length is calculated along the center line of the rebar:
Sum segm rebar axis counts rebar lengths from rebar geometry. This option does not take into account bending radius lengths. Length TplEd takes rebar length from template attribute (user attribute property LENGTH). These options are only available for some of the following mark content:
|
Total number in rebar group Number displayed in view Total number in cast unit |
These options are only available for mark content Number. Total number in rebar group : Displays the total number of rebars in the rebar group, regardless of the number of the physically visible rebars in the drawing. Number displayed in view : Only displays the number of the visible rebars in the drawing view. Total number in cast unit : Displays the total number of rebars in the cast unit. |
Row distance |
Define the distance between the mark rows. Example: Row distance = 0
Example: Row distance = 5
|
Extra line length |
When Mark 1 and Mark 2 have no text, the Extra line length setting on the Mark 3 tab is activated. Specify the length of the line. |


Lines and symbols tab
On the Lines and symbols tab, you can define the generation and layout of the lines and the symbols for the rebar mark.
| Setting | Options and descriptions |
|---|---|
Distribution line : Color Distribution line : Line type Leader line : Color Leader line : Line type |
Define the Color and Line type for the Distribution line and the Leader line. |
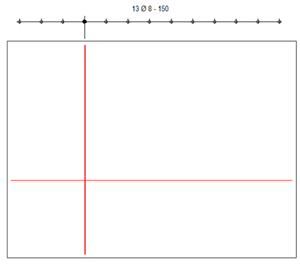
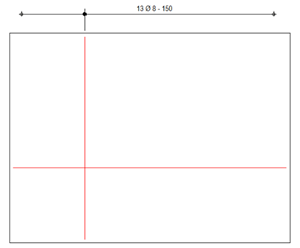
Visualized rebar s : Small lines Visualized rebar s : Symbols |
Define the generation of the symbols and lines on the dimension lines of the visible rebars. The options are:
Examples:
|
Not visualized rebars First and last rebar |
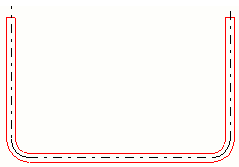
The settings listed below only apply for Not visualized rebars and Not visualized rebars. The settings are only applicable if the option bar in the middle of group is defined for Visibility of reinforcing bars in group in the Drawing reinforcement properties dialog box. Define if symbols/lines should be applied for Not visualized rebars or Not visualized rebars. Example of Not visualized rebars :
Example of Not visualized rebars :
Define the generation of the symbols and lines for the dimension line. The options are:
|
|
Define how to place the symbols. The options and their examples are listed below:
You can define the distance between the lines by using the setting a if that is available for the option. |


 : Define the color and the line type for the lines.
 : Define the symbol file and symbol number to be used. You can use existing symbols in
  : Define the color and the size of the symbol.